Showing posts with label BUILDING CONSTRUCTION. Show all posts

Sunday 17 August 2014

LOS ANGELES ABRASION TEST , HOW and WHY TO PERFORM

LOS ANGELES ABRASION TEST:


This is hardness test for aggregates, used in Laboratory  to determine the hardness value or abrasion value 
APPARATUS :

 Los Angeles Abrasion Testing Machine ,
Abrasive Charge – Cast iron or steel balls ,
Test sieve – 1.70 mm IS sieve ,
 Balance of capacity 10 kg , Oven , Tray

The aggregate used in surface course of the highway pavements are subjected to wearing due to movement of traffic. 

When vehicles move on the road, the soil particles present between the pneumatic tyres and road surface cause abrasion of road aggregates. 

The steel reamed wheels of animal driven vehicles also cause considerable abrasion of the road surface. 

Therefore, the road aggregates should be hard enough to resist abrasion. 

The principle of Los Angeles abrasion test is to produce abrasive action by use of standard steel balls which when mixed with aggregates and rotated in a drum for specific number of revolutions also causes impact on aggregates. 

The percentage wear of the aggregates due to rubbing with steel balls is determined and is known as Los Angeles Abrasion Value.


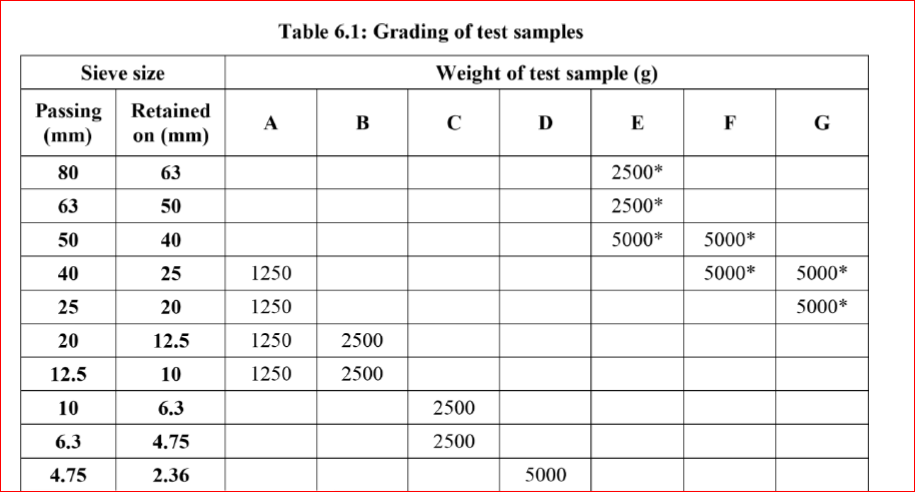
Key point of los angles test:

Rotate the machine at a speed of 30 – 33 revolutions per minute. The number of revolutions is 500 for grading A, B, C & D and 1000 for grading E, F & G. The machine should be

5 kg of sample for grading A, B, C & D and 10 kg for grading E, F & G

THE CALCULATION PART:

Original weight of aggregate sample = W1 g
Weight of aggregate sample retained = W2 g
Weight passing 1.7mm IS sieve = W1 - W2 g
Los Angeles Abrasion Value = (W1 - W2) / W1 X 100


Los angeles abrasion value should lies in below given range for different types of roads


Types of pavement layers                                         Max. Permissible Abrasion Value in %

1:WBM , SUB BASE COURSE                                                      60%

2:WBM BASE COURSE WITH BITUMEN SURFACE               50%

3: BITUMEN BOUND MACADAM                                             50%

4:WBM SURFACING COURSE                                                    40%

5: BITUMINOUS PENETRATION MACADAM                              40%

6:BITUMINOUS SURFACING DRESSING CEMENT
 CONCRETE SURFACING COURSE                                              35%

7:BITUMINOUS CONCRETE SURFACING COURSE                   30%

Monday 28 October 2013

Test for Bricks:


(1) Absorption:
A brick is taken and it is weighed dry. It is then immersed in water for a period of 16 hours. It is weighed again and the difference in weight indicates the amount of water absorbed by the brick. It should not in exceed 20 per cent of weight of dry brick.
(2) Compressive/Crushing strength of Bricks:
The crushing strength of a brick is found out by placing it in a compression testing machine. It is pressed till it breaks.  the minimum crushing or compressive strength of bricks is 3.50 N/mm2. 

The bricks with crushing strength in between of 7 N/mm2 to 14 N/mm2 are graded as A and those having above 14 N/mm2 are graded as AA, 
(3) Hardness test on bricks:
In this test, a scratch is made on brick surface with the help of a finger nail. If no impression is left on the surface, the brick is r sufficiently hard.
(4) Presence of soluble salts:
The soluble salts, if present in cause efflorescence on the surface of bricks. For finding out the presence of soluble salts in a brick, it is immersed in water for 24 hours. It is then taken out and allowed to dry in shade. The absence of grey or white deposits on indicates absence of soluble salts.

If the white deposits cover about 10 per cent surface, the efflorescence is said to be slight and it is considered as moderate, when the white deposits cover about 50 per cent of surface. If grey or white deposits are found on more than 50 per cent of surface, the efflorescence becomes heavy and it is treated as serious, when such deposits are converted into powdery mass.
(5) Shape and size:
In this test, a brick is closely inspected. It should be of standard size and its shape should be truly rectangular with sharp edges. For this purpose, 20 bricks of standard size (190 mm x 90 mm x 90 mm) are selected at random and they are stacked lengthwise, along the width and along the height.
(6) Soundness test on brick:
In this test, the two bricks are taken and they are struck with each other. 
The bricks should not break and a clear ringing sound should be produced.

Other test can be perform but these 6 are the important once.

Monday 15 April 2013

==>>DEEP FOUNDATION==>>

DEEP FOUNDATION==>>
Deep foundation are those in which the depth of the foundation is very large i comparison to its width.. Deep foundation are not constructed by ordinary methods of open pit excavations.

TYPE OF DEEP FOUNDATION==>>

1==> PILE FOUNDATION
2==> PIER FOUNDATION
3==> CAISSON FOUNDATION


PILE FOUNDATION==>> Pile foundation is that type of foundation in which the loads are taken to a low level by means of vertical members which may be of timber , concrete or steel...

PIER FOUNDATION==>> A pier foundation consists of a cylindrical column of large diameter to support and transfer large super imposed loads to the firm strata below..
The difference between pile foundation and pier foundation lies in the method of construction.Though pile foundation transfer the load through friction or bearing , pier foundation transfer the loads only through bearing.

CAISSON FOUNDATION==>> Well foundation or caissons are box like structure circular or rectangular which are sunk from the surface of either land or water to the desired depth.
They are much larger diameter than pier foundations.
Use of well foundation
=> Wharves , quay walls , docks.
=> Bridge piers and abutments in rivers, lakes etc.
=>Large water front structures such as pump houses , subjected to heavy vertical and horizontal loads.

==>> Well foundation are hollow from inside , which may filled with sand , ans are plugged at the bottom. The load is transferred through the perimeter wall, called steining.
This foundation are not use for buildings construction...

TYPES OF SHALLOW FOUNDATION==>>

Sunday 14 April 2013

==>> CLASSIFICATION OF BRICKS==>>


==>> CLASSIFICATION OF BRICKS==>>

FIRST CLASS BRICKS==>>

1. These are thoroughly burnt and are of deep red, cherry or copper colour.
2. The surface should be smooth and rectangular, with parallel, sharp and straight edges
and square corners.
3. These should be free from flaws, cracks and stones.
4. These should have uniform texture.
5. No impression should be left on the brick when a scratch is made by a finger nail.
6. The fractured surface of the brick should not show lumps of lime.
7. A metallic or ringing sound should come when two bricks are struck against each other.
8. Water absorption should be 12–15% of its dry weight when immersed in cold water for
24 hours.
9. The crushing strength of the brick should not be less than 10 N/mm2. This limit varies
with different Government organizations around the country.
Uses: First class bricks are recommended for pointing, exposed face work in masonry
structures, flooring and reinforced brick work.

SECOND CLASS BRICKS==>>


  Are supposed to have the same requirements as the first class ones except that

1. Small cracks and distortions are permitted.
2. A little higher water absorption of about 16–20% of its dry weight is allowed.
3. The crushing strength should not be less than 7.0 N/mm2.
Uses: Second class bricks are recommended for all important or unimportant hidden masonry
works and centering of reinforced brick and reinforced cement concrete (RCC) structures.


THIRD CLASS BRICKS==>>

Are underburnt. They are soft and light-coloured producing a dull sound when struck against
each other. Water absorption is about 25 per cent of dry weight.

Uses : It is used for building temporary structures.

FORTH CLASS BRICKS==>>
Are overburnt and badly distorted in shape and size and are brittle in
nature.

Uses: The ballast of such bricks is used for foundation and floors in lime concrete and road
metal.

==>>

Friday 12 April 2013

==>> SUB SOIL EXPLORATION<<==

==>> The purposes of subsoil exploration include the following:


l. Determining the nature of soil at the site and its stratification
2. Obtaining disturbed and undisturbed soil samples for visual identification and
appropriate laboratory tests
3. Determining the depth and nature of bedrock, if and when encountered
4. Performing somc in sl/u lield tests, such as permeability tests. vane
shear tests , and standard penetration tests
5. Observing drainage conditions from and into thc site
6. Assessinga ny special construction problems with respect to the existing  structure  nearby
7. Determining the position of the water table

Thursday 7 February 2013

==>>3D TOOLS USED IN AUTO CAD==>>


==>>3D TOOLS USED IN AUTO CAD==>>

FOR 2D TOOLS CLICK ON THIS LINK==>>

2D TOOLS USED IN CIVIL ENGINEERING

3darray – Creates an array of 3D models in 3D space
3dface (3f) – Creates a 3- or 4-sided 3D mesh behind which other features
can be hidden
3dmesh – Creates a 3D mesh in 3D space
3dcorbit – Allows methods of manipulating 3D models on screen
3ddistance – Allows the controlling of the distance of 3D models from the operator
3dfl y – Allows walkthroughs in any 3D plane
3dforbit – Controls the viewing of 3D models without constraint
3dmove – Shows a 3D move gizmo. Moves 3D objects
3dorbit (3do) – Allows a continuous movement and other methods of
manipulation of 3D models on screen
3dorbitctr – Allows further and a variety of other methods of
manipulation of 3D models on screen

3dpan – Allows the panning of 3D models vertically and horizontally on screen
3drotate – Displays a 3D rotate gizmo. Rotates 3D objects
3dscale – Shows a 3D scale gizmo. Scales 3D objects
3dsin – Brings the 3D Studio File Import dialog on screen
3dsout – Brings the 3D Studio Output File dialog on screen
3ddwf – Brings up the Export 3D DWF dialog on screen
3dwalk – Starts walk mode in 3D
anipath – Opens the Motion Path Animation dialog
Align – Allows selected entities to be aligned to selected points in 3D space
Ameconvert – Converts AME solid models (from Release 12) into
AutoCAD 2000 solid models
Box – Creates a 3D solid box

Cone – Creates a 3D model of a cone
convertoldlights – Converts lighting from previous releases to AutoCAD
2010 lighting
convertoldmaterials – Converts materials from previous releases to
AutoCAD 2010 materials
convtosolid – Converts plines and circles with thickness to 3D solids
convtosurface – Converts objects to surfaces
Cylinder – Creates a 3D cylinder
Dducs (uc) – Brings the UCS dialog on screen
Edgesurf – Creates a 3D mesh surface from four adjoining edges
Extrude (ext) – Extrudes a closed polyline
Flatshot – Brings the Flatshot dialog to screen
Freepoint – Point light created without settings
Freespot – Spot light created without settings
Helix – Constructs a helix
Interfere – Creates an interference solid from a selection of several solids
Intersect (in) – Creates an intersection solid from a group of solids
Light – Enables different forms of lighting to be placed in a scene
Lightlist – Opens the Lights in Model palette
Loft – Activates the Loft command

Materials – Opens the Materials palette
Matlib – Outdated instruction
Mesh – Can be used to set tessellations for a 3D primitive
Meshrefi ne – Refi nes the meshing of a 3D object
Meshsmooth – Increases the smoothness of 3D objects
Meshsmooth – Smoothes outlines of 3D objects
Mirror3d – Mirrors 3D models in 3D space in selected directions
Mview (mv) – When in PSpace brings in MSpace objects
Pface – Allows the construction of a 3D mesh through a number of
selected vertices
Plan – Allows a drawing in 3D space to be seen in plan (UCS World)
Planesurf – Creates a planar surface
Pointlight – Allows a point light to be created

Pspace (ps) – Changes MSpace to PSpace
Pyramid – Creates a pyramid
-render – Can be used to make rendering settings from the command line.
Note the hyphen ( - ) must precede render
Renderpresets – Opens the Render Presets Manager dialog
Renderwin – Opens the Render window
Revolve (rev) – Forms a solid of revolution from outlines
Revsurf – Creates a solid of revolution from a pline
Rmat – Brings the Materials palette on screen
Rpref (rpr) – Opens the Advanced Render Settings palette

Section (sec) – Creates a section plane in a 3D model
Shade (sha) – Shades a selected 3D model
Slice (sl) – Allows a 3D model to be cut into several parts
Solprof – Creates a profi le from a 3D solid model drawing
Sphere – Creates a 3D solid model sphere
Spotlight – Creates a spotlight
Stlout – Saves a 3D model drawing in ASCII or binary format
Sunproperties – Opens the Sun Properties palette
Sweep – Creates a 3D model from a 2D outline along a path

Tabsurf – Creates a 3D solid from an outline and a direction vector
Torus (tor) – Allows a 3D torus to be created
Ucs – Allows settings of the UCS plane
Union (uni) – Unites 3D solids into a single solid
View – Creates view settings for 3D models
Visualstyles – Opens the Visual Styles Manager palette
Vpoint – Allows viewing positions to be set from x,y,z entries
Vports – Brings the Viewports dialog on screen
Wedge (we) – Creates a 3D solid in the shape of a wedge
Xedges – Creates a 3D wireframe for a 3D solid


INTERNAL TOOLS==>>

Etransmit – Brings the Create Transmittal
Publish – Brings the Publish dialog to screen

Get Posts In Your Inbox